Hello crafty friends!…
Today I am sharing a card that I made for a DT project over at The wonderful World of Alicia Bel.
To start things off…I am showing you how I make the sky background step by step… it’s a rather long post with lots of photos…so grab a coffee and join me in this mini tutorial…

Supplies used for the sky background:
Butterflies digi (link here), Xpress it Blending card, Tim Holtz Distress Oxide ink- Salty Ocean, MFT’s ‘Mini Cloud Edges’ stencil, mini finger dauber, scissors for fussy cutting.
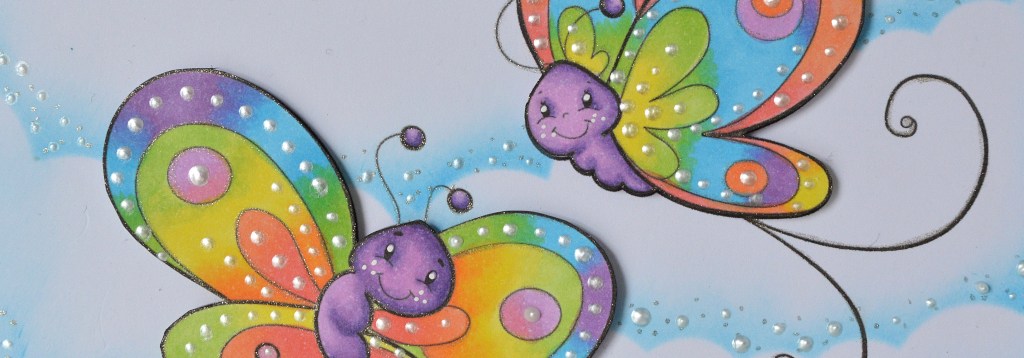
When I am using digital images, I use Silhouette Studio software (Designer Edition) to print the card fronts. This is also how I added the sentiment. I printed a second copy of the image (same size) because I will colour this with my Copic markers and cut them out to add to the card.

Firstly, I die cut the card front out with the Your Next Stamp Stitched rectangle die set. I used the largest one which measures 4″x 5.25″.
 I then taped the card front down using 1″ Post-It tape. I like this as it doesn’t tear your cardstock when you remove it.
You could make your own cloud stencil by simply using a cloud border die or by hand drawing cloud like bumps onto card and cutting them out by hand. I have used all of these methods and they all work as nicely as the plastic stencil I am using today.

I like to start at the bottom of the image. Place your stencil where you would like to start and lightly ink the first set of clouds. I like to use the finger daubers because I feel I have more control on the pressure and the amount of ink I use. Start with the dauber on the stencil and brush upwards holding the stencil with your other hand so it doesn’t move.

Because I am colouring the image seperately to add to the card later, I simply stencil straight over the image as I go up the card.

As you can see, I keep my inking quite thin as I like my clouds to look white and fluffy, However, you could extend the inking higher, blend different colours and add more lines of clouds for different effects. Pinterest is a great source for cloud inking designs and can look amazing and complicated… but the truth is… they’re NOT!…it’s all about having a go, experimenting and having FUN!!

For this card I added some shimmery dots to the shadows of the clouds using a Sakura ‘Clear star’ Gelly roll pen because I Loooovvvee a bit of sparkle!!

I coloured the butterflies with Copic markers: V15, B02, YG13, Y02, YR02 & R22. I also traced around the black lines of the image with the clear star gelly roll pen… again, SPARKLE!!!!

I then fussy cut the butterflies out, right up to the line and went around all the edges with a black marker just to cover the white of the card and it just finishes them off beautifully 🙂

I then popped the images on to ‘Scotch 3M foam tape’ to add a bit of dimension and finally put the card together. I added some extra dimension to the card with some ‘Perfet Pearls’ dots in opaque white and matted the panel onto some rainbow mirror card. The finished card is an A2 (4.25″x 5.5″) size.

What did you think of my first step by step tutorial? Was it too long? Was it not long enough? Do you want more? What would you like to see?…Please leave a comment in the box below…Like, share or follow for more projects!
Happy crafting and see you soon xxx
Jayne x

Leave a comment